A reader, and good friend, emailed me to ask about steps to take with her seedlings. Here are her questions:
I've started most of my herbs (basil, thyme, oregano, sage, rosemary) and a few flowering plants (dianthus and forget-me-nots) indoors. My seeds are all sprouting and doing well. So, I'm thinking now what? How long can they survive in those tiny little seed-starting pods? Do I transplant them into a larger container before hardening them and putting them in the ground or is that an extra step that'll stress them out? What should I be looking for to know when they're ready to go into the ground?
Since this is my first time doing anything from seed, I feel like I need some guidance with knowing when and how to take the next step and would greatly appreciate you sharing any of your wisdom on the subject! :)
Liz
First of all, all plants are different and any special directions on seed packets should be followed. However, there are general guidelines that I've found work most of the time.
Repotting Seedlings
When: If you start your seeds in something very small, like a peat pod or those small cell packs, you'll usually need to repot the seedlings before they go in the ground. I try to do so when the seedlings have a couple true leaves (the second set of leaves, not the first set that emerge from the soil). Until then, the plant doesn't really need the nutrition of potting soil because the first set of leaves are actually a food source for the seedling. Another sign to watch for is roots growing out of the pod/container. Repot as soon as you start seeing roots. Waiting too long can result in a root-bound plant or roots that have gotten tangled in the netting of your peat pod.
How: Be gentle with your seedlings as you repot and you should be able to avoid stressing them out too much.
For peat pods, gently tear or cut away the netting that surrounds the peat. If the roots have gotten tangled in the netting, cut away as much netting as you can without damaging the roots. You don't want the netting to restrict new root growth, but it's perfectly fine to leave a little if it's tangled in roots.
For seedlings in plastic containers, very gently massage the plastic in order to loosen the seedling from its little home. Then, place your hand over the soil and grasp the very base of the seedling, turn the whole container upside down, and let gravity help you as you gently gently gently pull the seedling out of the plastic.
If you've used something biodegradable, like a toilet paper tube, small newspaper pot, or small Jiffy Pot (though, Jiffy Pots are usually big enough to last a while), then this is going to be easy-peasy. These can just be gently placed right into the next container. Unless you can tell it's already breaking apart, it can also help to "open" the old biodegradable container first so your plant's roots can spread more easily. With the toilet paper tubes, I usually pull back the bottom folds so that it's open. With Jiffy pots, gently cut or tear away the bottom. Newspaper is probably less of an issue, unless you've made a very thick paper pot. Note that if you know a plant you're growing doesn't handle transplants very well (like cucumbers or peppers), it'll probably be easiest to opt for one of these biodegradable options for the least amount of stress.
Exceptions: Sometimes I'll keep small plants in their toilet paper tube or peat pods until transplant, usually if they're small plants in the first place. Strawberries from seed, for example, tend to stay small until they're outside in the sun. I just watch the roots to make sure they aren't outgrowing their homes. However, I also add some extra nutrition by occasionally spritzing them with liquid Terracycle.
Also, if you're determined to jumpstart a plant that is so sensitive to transplanting that they're supposed to be direct seeded into the garden, you should at least start them in a sizable biodegradable container so there's only one simple transplantation to be done.
Deciding When to Put Them in the Ground
This has more to do with temperature and seasons than anything else, so read your seed packets. They will usually say something along the lines of, "Transplant outside after the last frost date" or "Transplant after danger of frost has passed." In Oklahoma City, that's April 15th... but you still need to check the weather forecast and use common sense, because the "last frost date" is an estimate. Learn more about that date here.
Aside from that, I don't like to transplant seedlings until they have at least 3 or 4 true leaves (or are strong looking, if true leaves aren't a consideration such as with green onions). And you should never transplant without hardening off first. You can google for detailed instructions on hardening off, but the basic idea is to expose your plants to an outdoor environment little by little. I start with an hour, then a couple hours the next day, then a few hours, then all morning or afternoon, then all day a couple times in a row. Just make sure you pick mild days and keep them out of the wind until they're strong.
Showing posts with label transplanting. Show all posts
Showing posts with label transplanting. Show all posts
Monday, March 16, 2009


Monday, April 14, 2008
Last Frost (I Hope!) and Tomato Planting
Oklahoma City's average "last frost" is listed somewhere between early and middle April (depending on what source you're using), and last night was just about at 32. We brought in many of the plants and covered the rest, including the garden.


Everything made it through the night without a problem. I'm not even totally sure it got to freezing at any point.
But the really wonderful thing is that I'm pretty sure that's the last night we have to worry about freezing temperatures at all. Before I'd even finished my coffee this morning, I was out in the garden planting the tomatoes! The results:


They look so tiny now that they're up to their necks in garden soil! It was sad to see them go from looking like impressive tomato plants to itty bitty seedlings again, but I'll appreciate myself for that later in the season though, when they're growing strong because of their deep, fabulous root systems. I'm really going to have to work at containing them in their cages, but at least the cages seem quite sturdy once all four have been tied together.
So, what tomato plants wound up in the garden?
Two Pink Brandywines:


One Supersweet 100:

One Genovese:

The Genovese is a new plant I purchased for 75 cents at the farmer's market this Saturday. The third Brandywine I was going to put in the garden is still clearly stunted from lack of water when it was a tiny seedling, so it's not likely to ever produce much. I'm keeping it in a small pot for a little while just incase anything happens to the other Brandywines, but he's pretty much out of the running now.
I also planted the other Supersweet 100 in one of my largest pots, added a purple basil (I always try to pair a basil with my tomato plants!), and set it just outside the back steps:

He looks positively dwarfed next to that full-grown basil! But it's all for the sake of a good root system, and soon he'll be the one doing the towering.
As for the hanging Red Robin tomato plants, one of them has two reddening tomatoes! I'll surely take photos and gloat as soon as they're ready to pick.
Friday, April 11, 2008
June-Bearing Strawberries
Strawberry update!!!
I have a basket of June-bearers just outside my back door that is just a pleasure to watch. First of all, the older of the two plants in that basket is already growing strawberries!

The plant on the other side of the basket has been in it's sunny little home for only a day. You see, I'd decided I had more than enough strawberry plants with all those Alexandrias... but I'm still so drawn to them! So I stopped by the garden center at hell Wal-Mart while running an errand there yesterday and looked at all of their lovely strawberry plants. Some had berries already, but looked like they were in terrible shape. (Actually, just about everything was in bad shape there. I don't know if it was because they weren't sheltered in the recent storm or because it was Wal-Mart.) But next to those were beautiful, broad-leafed strawberry plants boasting a claim to pink blossoms, and all I could think about was how lovely that would look paired with the white-blossoming plant above.
I touched and sniffed and looked for interesting leaves. Then I picked up one plant and it seemed to tug right back, unwilling to leave its brothers and sisters. A little gentle investigation revealed that it had set out two runners into the separate pots of two other plants, so this was in fact three strawberry plants in one. At 88 cents a pot, how in the world could I pass up an experiment like this? I snatched it right up.
Once home, I snipped off the larger of the baby strawberry plants and put it in a pot. It already had a good start on its roots, you see, so it was time to take that work load off of the mother plant. The other one only had a few roots though, so I rigged up the set up you see below:

Basically, I potted the mother plant in her forever-home then dug a shallow indentation next to her so that I could pot the baby separately without cutting the runner it was attached to. I'll give it a few days to establish itself, then I'll "cut the cord" for the mother's sake.
That's the thing about runners. You end up with more plants, but the process takes a lot of energy from the mother plant. You have to cut the runners off if you want berries from the mother. If you don't want to sacrifice berry production in order to gain baby strawberry plants, then you want to cut the runners at first sight.
That said, you can also use this method to increase next year's berry yield significantly if you're in a warm environment or can otherwise over-winter the plants. Pinch off any blossoms as they appear, let those runners take root and grow a bit before cutting the cord, and then you'll have tons of plants for next year.
As for me, I'll stick with these two runners and snip anymore that show up. I really only got the June-bearers for instant gratification. Next year, I should be up to me ears in berries from the ever-bearers!
Monday, March 31, 2008
Storms, Pictures, and Various Seedling Updates
I've been up since the tornado sirens tonight, but nothing more than rain and lightening actually came close to our neighborhood. The entire time the sirens were going, though, all I could think about was the fact that I had opted to leave all of the seedlings outside for the night! Nooooo!!!
But no tornadoes for us, thank goodness. I think I may have heard some hail though, so I hope nothing got hurt.
In any case, I recently took pictures of some of the young garden plants, which are coming along rather nicely.
Onions:
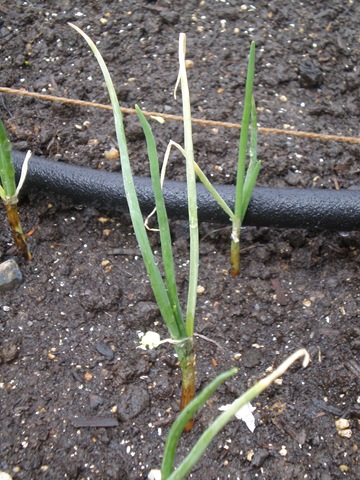
The onions really are looking nice. It's so tempting to pull back the dirt and look for bulbs!
Little Gem Romaine lettuce:
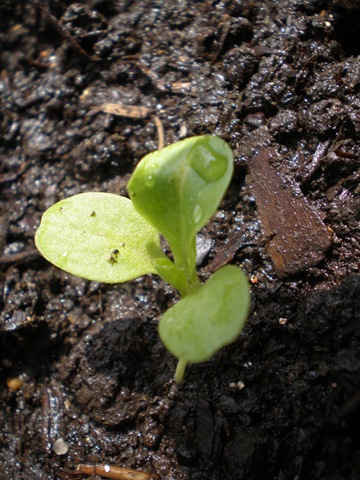
They're all growing sets of true leaves, so it shouldn't be long before we actually have tiny little bunches of lettuce.
White Icicle Radish:
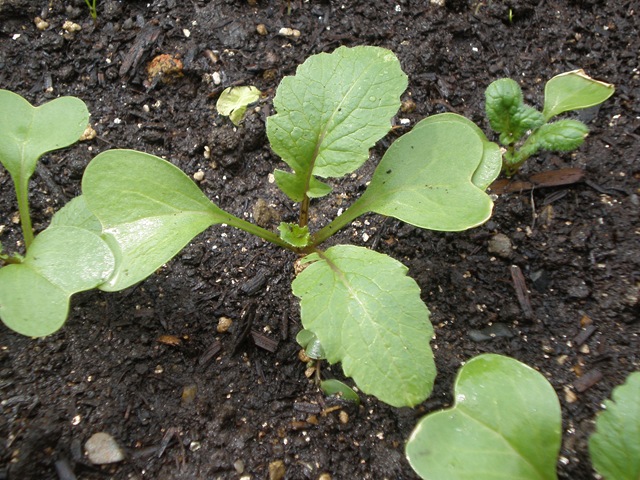
Most of them have true leaves now, and a couple of them are just huge! These were a very last-second addition to the garden, and I'm so pleased I decided to try them.
Sugar Snap Pea:
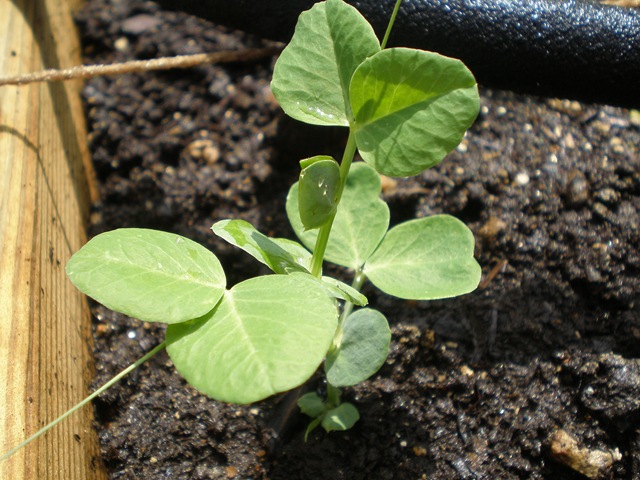
All four of the sugar snap peas are getting big and beautiful like this fellow. Look at the little tendrils seeking support! It's definitely time to put in the trellis... this week.
Cucumber plants are finally peeking over the soil, but don't look like much so far. I had to thin the carrots like mad, but they aren't very interesting looking plants yet. I'll post photos as soon as they're a little more visible.
Strawberries!
I've potted a few strawberries. A basket with two June-bearing varieties, a basket of Alexandrias, a basket of Alpines, and one single Alexandria sitting on the bottom back step (to see if the stray cats will leave strawberries alone before I risk them in large numbers). Most of them look wimpy so far, but the ones that have been in their pots for a while are getting stronger.
Emergency Tomato Transplants
I had a tomato transplanting emergency the other day. The seedlings were outside for hardening off (which is complete!) and the Oklahoma wind decided to pick up like mad once I was inside. It managed to crack one of the delicate brandywine seedlings right at the base. It was time to put them in more soil anyway, so I hurriedly repotted them all up to their necks and the cracked seedling is still looking healthy. Seriously, I would have stomped childishly if I'd lost it. I feel like I didn't start enough of the brandywines, and one already looks less healthy than the others.
Just about two more weeks until it's time to put them in the ground!
Flowers
As I've commented before, I'm more into edible gardening than flower gardening or landscaping. However, Chad and I have made quite a team on the porch and in the flower bed. He's put something like 20 purple annuals in the flower bed so it'll look nice and full while the perennials establish themselves, and I've started seeds in several pots on the porch. There are cheapie square planters on each step up to the porch with tiny Petite Marigold seedlings, and we got a little experimental by planting the marigolds in a ring around alyssum in two squat barrel-style planters on either side of the porch. Tiny seedlings in these, too. We'll take photos once they're more visible. I'm honestly not the biggest fan of Marigolds, but it's difficult to pass up 10 cent seed packets and they do make decent mosquito deterrents.
What I'd like to do next year, however, is to grow only edible flowers in pots, and maybe even a few in or around the vegetable garden. Decoration is nice, but I much prefer plants with more of a purpose.
Tuesday, March 11, 2008
Repotting and Seedling Cleanup
Phwew, yesterday was productive!
I think I have a plan for growing container tomatoes in the future. Once they're ready for a full-sized pot, I'm going to plant them deeply and with a few inches left at the top of the pot. This way, I can fill in more soil once they're larger and leggy. I think this'll work nicely.
- Re-potted Red Robin Tomato plants into hanging cone planters.
- Watered and checked on garden. Onions are doing fabulously, but I see no growth from seeds yet.
- Put baby tomato plants into some soil in a four-cell tray, as their little roots were starting to poke out of the peat pods.
- Started "cat grass" in a left over plastic tray for the kitties.
- Threw out dead seedlings (used their soil for re-potting!) & consolidated the living onto one large tray.
I think I have a plan for growing container tomatoes in the future. Once they're ready for a full-sized pot, I'm going to plant them deeply and with a few inches left at the top of the pot. This way, I can fill in more soil once they're larger and leggy. I think this'll work nicely.
Subscribe to:
Posts (Atom)


 Posts
Posts

