Showing posts with label seed starting. Show all posts

Saturday, January 30, 2010

Alpine Strawberries from Seed (Kit)

Speaking of cute kits, Target has these adorable little strawberry growing kits (as well as flower kits) in their dollar section for Valentine's Day. I've picked these up a couple years in a row, and they're pretty cool... but they're also an example of how a kit could result in frustration for a first-time gardener.

First of all, keep in mind that growing strawberries from seed isn't the easiest task for a beginning gardener. The seeds are minuscule, the seedlings dry out so easily, and they're delicate. It can be done, but you have to check on them daily and handle them carefully. Second, the kit suggests that 10 seedlings would flourish in virtually no space at all! It comes with a teeny tiny pot, a small packet of about 20 Alpine Strawberry seeds, and a pellet of growing medium. But trust me, you don't want to put 10 seeds in that teeny pot! It's not nearly enough room.

Instead:
  • Use something like peat pods (or my budget version: toilet paper roll pods) or seedling cells with seed-starter mix.
  • Put only one or two strawberry seeds in each pod/cell.
  • Water from the BOTTOM by pouring water in the seedlings' tray, because those tiny seeds could wash right away if you water from the top.
  • Keep everything consistently moist! These plants are so tiny that they dry out FAST when mere seedlings.
  • Later, you can harden them off and put the plants in hanging baskets or a strawberry planter... or maybe along the edges of your flower bed, as they are quite lovely little plants.
But let's not waste that gowing medium pellet and teeny pot. If you want, you can use them as directed but sow only one or two seeds in the little pot. Just don't over-water, because the pot has no drainage hole. You can also use the pot as a cute container to give away one of the seedlings when they're almost grown. I did this as a gift to a gardening friend of mine, a couple years ago. (In this case, you can hydrate the growing medium pellet and mix it into the rest of your seed-starting mix for another seedling project.)

Alpine strawberries are a small, everbearing variety. That means that, instead of one large harvest at once, it'll give you several small harvests. It's one of the easier varieties to grow from seed, and it's less likely to take over your garden if you put them in the ground. They're about as close to a "wild strawberry" as you'll get in a domesticated plant. They're fairly similar to Alexandria strawberries.

Monday, March 16, 2009

Repotting Seedlings: Reader Question

A reader, and good friend, emailed me to ask about steps to take with her seedlings. Here are her questions:

I've started most of my herbs (basil, thyme, oregano, sage, rosemary) and a few flowering plants (dianthus and forget-me-nots) indoors. My seeds are all sprouting and doing well. So, I'm thinking now what? How long can they survive in those tiny little seed-starting pods? Do I transplant them into a larger container before hardening them and putting them in the ground or is that an extra step that'll stress them out? What should I be looking for to know when they're ready to go into the ground?

Since this is my first time doing anything from seed, I feel like I need some guidance with knowing when and how to take the next step and would greatly appreciate you sharing any of your wisdom on the subject! :)

Liz

First of all, all plants are different and any special directions on seed packets should be followed. However, there are general guidelines that I've found work most of the time.

Repotting Seedlings


When: If you start your seeds in something very small, like a peat pod or those small cell packs, you'll usually need to repot the seedlings before they go in the ground. I try to do so when the seedlings have a couple true leaves (the second set of leaves, not the first set that emerge from the soil). Until then, the plant doesn't really need the nutrition of potting soil because the first set of leaves are actually a food source for the seedling. Another sign to watch for is roots growing out of the pod/container. Repot as soon as you start seeing roots. Waiting too long can result in a root-bound plant or roots that have gotten tangled in the netting of your peat pod.


How: Be gentle with your seedlings as you repot and you should be able to avoid stressing them out too much.

For peat pods, gently tear or cut away the netting that surrounds the peat. If the roots have gotten tangled in the netting, cut away as much netting as you can without damaging the roots. You don't want the netting to restrict new root growth, but it's perfectly fine to leave a little if it's tangled in roots.

For seedlings in plastic containers, very gently massage the plastic in order to loosen the seedling from its little home. Then, place your hand over the soil and grasp the very base of the seedling, turn the whole container upside down, and let gravity help you as you gently gently gently pull the seedling out of the plastic.

If you've used something biodegradable, like a toilet paper tube, small newspaper pot, or small Jiffy Pot (though, Jiffy Pots are usually big enough to last a while), then this is going to be easy-peasy. These can just be gently placed right into the next container. Unless you can tell it's already breaking apart, it can also help to "open" the old biodegradable container first so your plant's roots can spread more easily. With the toilet paper tubes, I usually pull back the bottom folds so that it's open. With Jiffy pots, gently cut or tear away the bottom. Newspaper is probably less of an issue, unless you've made a very thick paper pot. Note that if you know a plant you're growing doesn't handle transplants very well (like cucumbers or peppers), it'll probably be easiest to opt for one of these biodegradable options for the least amount of stress.

Exceptions: Sometimes I'll keep small plants in their toilet paper tube or peat pods until transplant, usually if they're small plants in the first place. Strawberries from seed, for example, tend to stay small until they're outside in the sun. I just watch the roots to make sure they aren't outgrowing their homes. However, I also add some extra nutrition by occasionally spritzing them with liquid Terracycle.

Also, if you're determined to jumpstart a plant that is so sensitive to transplanting that they're supposed to be direct seeded into the garden, you should at least start them in a sizable biodegradable container so there's only one simple transplantation to be done.

Deciding When to Put Them in the Ground

This has more to do with temperature and seasons than anything else, so read your seed packets. They will usually say something along the lines of, "Transplant outside after the last frost date" or "Transplant after danger of frost has passed." In Oklahoma City, that's April 15th... but you still need to check the weather forecast and use common sense, because the "last frost date" is an estimate. Learn more about that date here.

Aside from that, I don't like to transplant seedlings until they have at least 3 or 4 true leaves (or are strong looking, if true leaves aren't a consideration such as with green onions). And you should never transplant without hardening off first. You can google for detailed instructions on hardening off, but the basic idea is to expose your plants to an outdoor environment little by little. I start with an hour, then a couple hours the next day, then a few hours, then all morning or afternoon, then all day a couple times in a row. Just make sure you pick mild days and keep them out of the wind until they're strong.

Saturday, March 7, 2009

Seedlings and Strawberries!

I just had to share pictures of my seedlings and new strawberry plants....

This is my primary vegetable seedling setup. It's an overcast day, but these guys normally get a pretty good amount of sun in the south-facing windows of the laundry room.


I also have a shelf in the laundry room where I usually put my seeds when I first start them, until they actually emerge.


Some of the more interesting seedlings I've been watching daily are...

The Alpine Strawberries, which are still teeny tiny:


The Burgundy okra, which has huge baby leaves and a touch of burgundy color on the stem:


The first of the Rainbow Swiss Chard, which I was surprised to discover is immediately colorful:


I also picked up two mature Junebearing strawberry plants at the Farmer's Market today. As much as I enjoy growing everbearing plants from seed, it's just nice to have a couple Junebearers for a little instant gratification. I went ahead and put them in a hanging basket that I can bring inside at night and on colder days:


On a sidenote, our kitties reap the benefits of my gardening hobby as well. I often grow cat grass to keep indoors for them. Our indoor-outdoor cat named Oz doesn't care much about it, but our indoor cat named Ali loves it. Though, she was clearly more interested in what my jeans smelled like this afternoon:

Saturday, January 31, 2009

Gardening on a Budget: Seed Starting

There are hundreds of fun and fabulous seed starting products out there, but you don't have to spend all that money. If you can at least invest in a bag of Seed Starting Medium or very lightweight potting soil, that alone will get you off to a great start.

Cheaper Than Peat Pellets/Pods:
Those seed starting pods or pellets, the kind that come looking like little disks then expand in water to look like a huge brown marshmallow, are admittedly handy. However, you can imitate these will little effort and money:

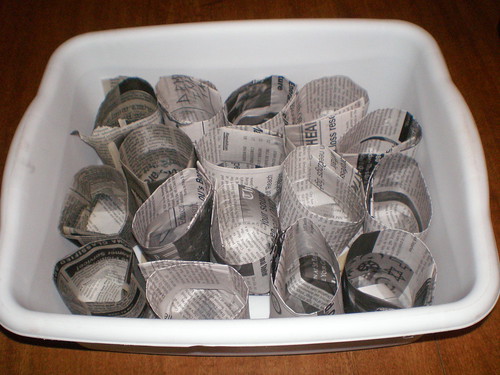
1. Save the tubes from inside your toilet paper rolls.
2. Cut a tube in half, resulting in two shorter tubes. (Note that this is optional. You could use the entire tube if you feel like the plants you're growing need more room for their roots to stretch out before they are transplanted or moved to a larger container.)


3. Take one of those half-tubes and decide which end will be the "bottom" of your peat pod. Make a few cuts in the bottom of the tube so that you will be able to fold it in on itself.


3. Fold in the bottom of the half-tube, making sure the bottom of it is mostly closed. Repeat until you have as many folded half-tubes as needed.


4. Place these tubes in a water-proof tray of some sort.


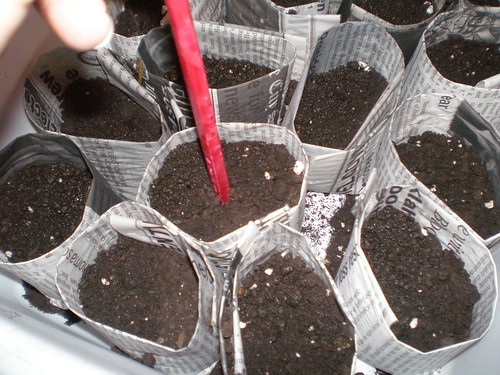
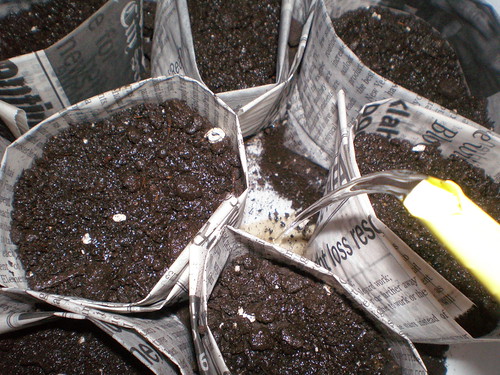
5. Fill each with seed starting medium or a lightweight potting soil.


6. Plant seeds as directed.
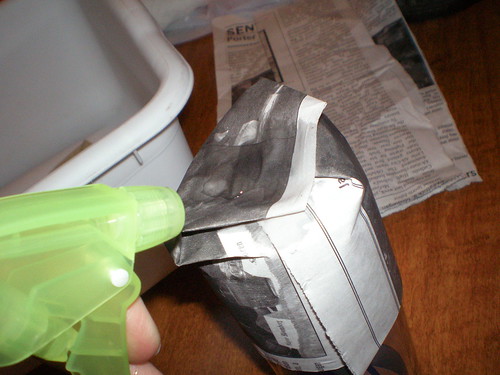
7. Water these by pouring water into the tray, not by pouring it directly onto the soil.
8. My general rule of thumb is to transplant these, tube and all, into a newspaper/Jiffy pot with potting soil soon after they develop their first set of "true leaves."

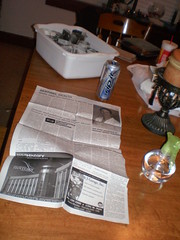
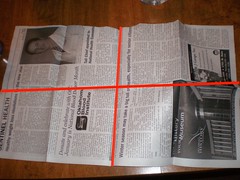
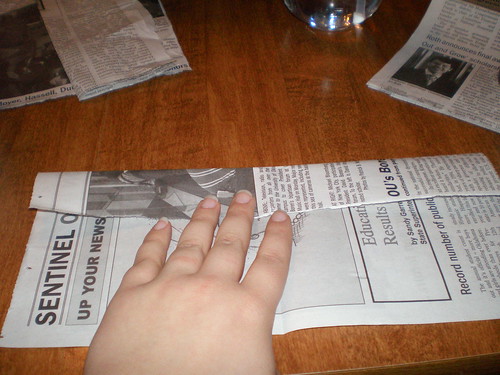
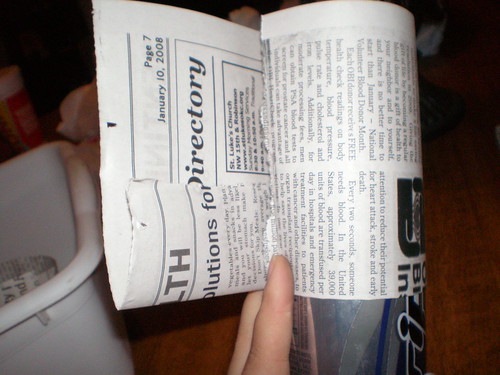
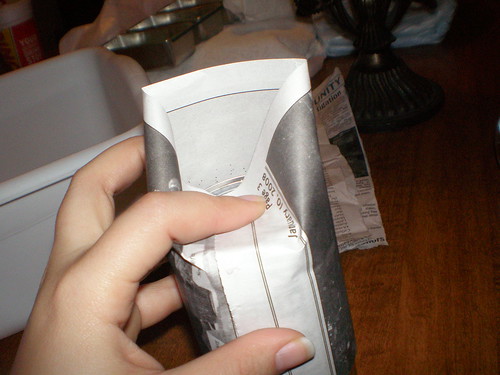
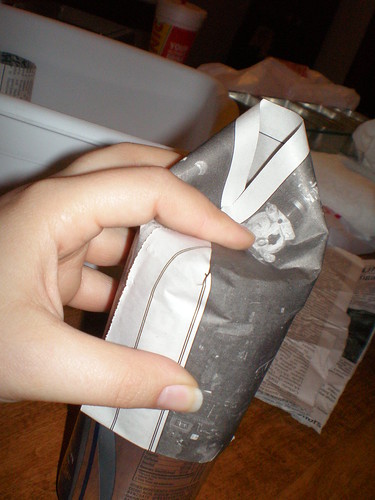
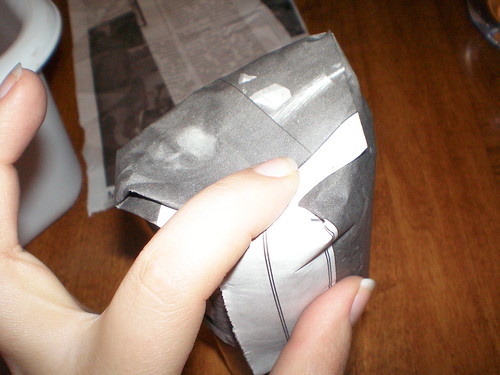
Cheaper Than Those Biodegradable Jiffy Pots: Jiffy pots are also very convenient, but there's a nearly free alternative to these as well. You'll need to make sure you have a tray or tub with sides as high as the pots will be tall, but you can make newspaper pots, the creation of which I illustrated last year.

Cheaper Than Fancy Trays: You can use damn near anything as a water-proof tray to hold your seedlings. I love using plastic food containers that used to hold things like bakery cookies. Plastic dish tubs from the dollar store are useful, especially when seedlings have been moved to larger newspaper or Jiffy pots. On the smaller scale, butter tubs (or a spreadable cheese tub, like I used in the pictures above) do well. Amazingly, Skinny Cow ice cream sandwich containers fit the toilet paper tube "pods" (and actual peat pods) perfectly, and they also fit right onto our windowsills. Just make sure that anything you use that once contained food has been cleaned out properly.

Cheaper than Grow Lights: Grow lights can help prevent leggy seedlings, but they're also pretty expensive. A cheaper option would be to hang an inexpensive shop light over your seedlings instead. Or, like me, you can simply grow your seedlings on south-facing windowsills and deal with the fact that they'll be a tad bit leggy. (Sunlight is FREE!)

Cheaper than Buying Plastic Seedling Cells: Some people buy the little six-pack plastic cells when, just last year, they might have purchased flowers from the garden center in a nearly identical six-pack. Whenever I buy flowers (or other plants) in cells or small pots sturdy enough to still be in one piece after removal of the flowers, I rinse that sucker out and stash it away in my garage to use for flowers from seed the next year. (They also work for most veggies from seed, unless they have delicate roots.)

Cheaper than Any of That Other Stuff: This won't work with some seeds (read your packets!), but sometimes you can wait until the appropriate time to direct-seed them into the garden. My favorite thing about this method, to be honest, has little to do with money... it's the fact that there's no hardening off to be done at all. How convenient.

That's about all I can think of at the moment. Please post and share your ideas!
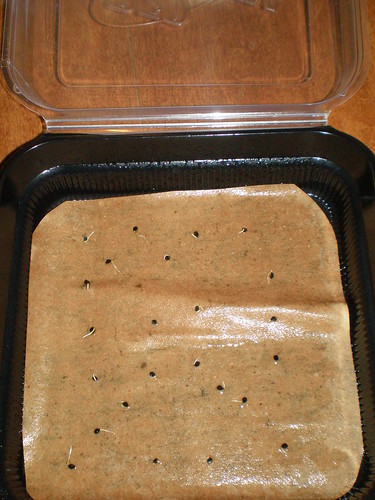
Saturday, July 5, 2008

It's Been a While!

It's been a little while since I updated, but here I am now!

We've gotten two big cucumbers out of the garden lately, plus lots of cherry tomatoes!  In fact, I served a bowl of cherry tomatoes as a snack when we had friends over the other night.

Most exciting is our first full-sized red tomato of the season!  A Genovese, to be specific:P7050100We'll most likely pick and eat it tomorrow.

No more carrots in the garden until it's time to seed for the fall.  A few of the onion tops turned yellow, so those got pulled:P7020075 They'll probably be drying outside for about another day, then I'll bring them inside for use/storage.  Most of the others will be picked quite soon as well.

It's also time to start thinking about fall crops, around the Oklahoma City area.  Broccoli should be started inside ASAP, if you haven't done it already.  Here's my broccoli seedling set up on the kitchen window sill:P7050105 It's actually a Skinny Cow ice cream sandwich container!!!  This, if nothing else, is a perfect excuse to eat ice cream!  Not only does it sit perfectly on our windowsill, but our repurposed toilet roll seedling pots fit into each sandwich slot perfectly:P7050106 These little pots are extremely easy to make. Cut the rolls in half first if putting them in a short container like this, but otherwise follow these instructions over at You Grow Girl.  Just be careful not to over-water, because I find that these are more likely to grow mold than peat pellets.  But once the seedlings need more soil, you can transplant it, roll and all, into its next home.  It's totally biodegradable.

Anyone else prepping for fall gardening out there?!  Here's a fabulous fall gardening document for fellow Oklahomans, thanks to OSU.

Wednesday, March 19, 2008

Underachievers and Overachievers

I am skeptical about the Tom Thumb Lettuce and the Carrots, as I've seen no signs of life from them so far. It may be time to soak the seeds until they have to sprout. Yes.... I think this is the new plan. I have so many seeds that I think it's well worth the try, even if it turns out I'm being paranoid.

Everything else is going as well as I could possibly hope for! I currently have something like two dozen strawberry seedlings getting their first taste of direct sunlight out on the front porch. Wheeee!

Saturday, March 15, 2008

Seedling Pictures

Radish Seedlings
Radishes
Lovely!

Radish Seedling
Radish Seedling
I planted the radishes mainly to deter cucumber bugs, but now I'm just pleased at how beautiful the seedlings are!

Little Gem Lettuce
Little Gem Lettuce Seedlings
Chris apparently dropped a TON of lettuce seeds into each hole. :) No problem. I'll give them another day or two to see if there's a particularly strong looking individual and snip out the rest of them.

Sugar Snap Pea
Sugar Snap Pea

Onion in a Soda Pop Cloche
Not a seedling, but I love this one that Chad took!

Friday, March 14, 2008

Seedlings, Seedlings!!!

Oh me of little faith, the garden has seedlings today!!! Several radishes, a lettuce, and maybe a carrot. One of the sugar snap peas seems to be on it's way, as well!

Oh well, no problem. I had more seeds than I'd ever use before they went bad (and still do!). I still think some of the original seeds are too deep, so those squares will benefit from my shallow reseeding.

Chad has the camera at work, so I'm going to bug him to take photos when he gets home. He has a much better eye for photography than I do, anyway.

Thursday, March 13, 2008

Follow Your Instincts

Concerned about the single sugar snap pea starting to root and utter lack of seedlings, I decided to reseed the garden this afternoon.

Maybe the soil I like to use is a too heavy or something, but I've just always had better luck with putting seeds either right on the surface with a little soil sprinkled over them or poking a hole, dropping one in, and leaving that hole open. I think I may start following my instincts the first time around rather than following the depth instructions on the seed packets.

I've removed most of the two-liters from the onions so they're easier to water evenly, but they are at the ready for cold nights.

Tuesday, January 29, 2008

Babies!!!!!!

There are six, count them, six baby strawberry plants on my windowsill! They are weeeeee leetle things with nothing but their two little baby leaves so far, but they are definitely seedlings! And they've only been in peat for about two and a half days!

I must not get my hopes up.... I must not get my hopes up....

I swear, I feel like I have as much emotionally riding on these little strawberry plants as I do on my upcoming job interview.


Keep your fingers crossed for me! One set for the strawberries, the other for my Thursday job interview!

Sunday, January 27, 2008

Seedlings, seedlings, seedlings!

About a third of the sprouted onion seeds are peeking out of the newspaper pots, the Tom Thumb lettuce has begun to poke out of their peat pellets (but not the Red Gem lettuce, so far), the Alexandria strawberries sprouted beautifully in their damp take-out box and have been moved to peat pellets (I've also put several Alpine Strawberry seeds on pellets), and I'm still waiting anxiously to see the first tomato seedling.

I've decided I'm a fan of sprouting seeds before putting them in any kind of soil. You have to watch cautiously for signs of that annoying fuzzy white mold, though.

Tuesday, January 22, 2008

Onion Sprouts and Newspaper Pots

A few days ago, I decided to start some onion seeds....

I sprouted them in this plastic take-out tray. I cut a piece of paper bag to fit the bottom, sprayed it until it soaked up the water, and sprinkled onion seeds in. Once the top is snapped shut, it stays nice and moist. I kept them near a sunny window to stay warm. And tonight, they were ready to go.
Onion Sprouts

A close-up:
Onion Sprouts Close-Up

Time to put them into some soil! It's far too cold out even for cool-weather crops, though. Newspaper pots to the rescue! After a little trial and error, here's how I made them....

You'll need black and white newspaper, a soda can, a tray or small tub, a spray bottle, and potting soil.
Newspaper Pot Materials

Cut or tear black and white newspaper into single pages and then into into quarters.
Paper

Take one of those quarters and make any adjustments to size that would be appropriate for your purposes. I folded one edge over, as shown below, to make them shorter and more uniform.
Fold the Paper

Now, wrap the paper around a soda can, letting a couple inches extend beyond the top of the can. It should overlap itself. Notice that I have put my fold on the bottom, which lets the ragged end extend beyond the can.
The Overlap

Now we're going to form the bottom of the pot. At the overlap, fold the paper over the top of the can.
Fold #1

Fold it a second time, leaving just a point of paper.
Fold #2

Fold that final point down. Voila! You've just formed a biodegradable seedling pot!
Fold #3

But it's not going to stay together all by itself. I found that it helped to spritz the folds of the pot bottom as well as the edge of the overlap.
Dampen the Folds

Place them all in the tray or tub. They should be somewhat snug, so that they will help each other hold their forms, but not crushed together. Voila!!! Your very own biodegradable seedling pots for FREE!
Snug in a Tub

They held their forms quite nicely once they were all nested and filled with soil. Here I am making indentations for my onion seeds.
Pots Filled With Soil

I put in the 16 healthiest looking sprouted seeds, covered them, gently misted the soil with the spray bottle until it looked nicely moist on top, then poured water into the tub itself to allow the pots to soak it up. I'll primarily water them by misting heavily, since I didn't set up the tub to allow the pots to drain. (You could do so by putting a layer of rocks beneath them.)
Watering

I put plastic wrap over it to hold in the moisture and keep out the cats, and I'll make room for it in the sunny laundry room tomorrow.

Once ready to plant, I can just plop the pots in the ground and the paper will biodegrade and become part of the soil. If you make these, keep in mind that they aren't as sturdy and peat pots. You may want to double the thickness if you're concerned about them falling apart when you lift them out, but I plan on lifting them out with a kitchen spatula while holding them with my other hand. Once plopped in the ground, I want them to fall apart as quickly as possible.

One other note: I'd avoid color newspaper. I've read in more than one source that you shouldn't compost newspaper with colored ink if the compost is going into a vegetable garden, so I'd venture to guess that you should keep those colored inks out of your garden entirely.