Wednesday, January 30, 2008

Soda Bottle Pots

Time to raid the recycling bin!

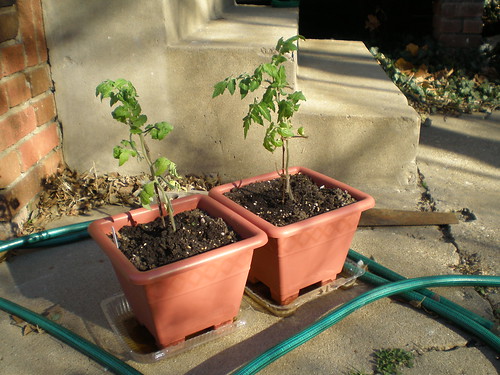
This is a little trick I use when I don't have enough pots for relatively small plants. The single serving soda bottles are perfect for seedlings and the two-liters are great for something a little more substantial. Since my husband has a Diet Dr. Pepper addiction, I have a nearly endless supply of the two-liters....

Bottle Pots Before & After

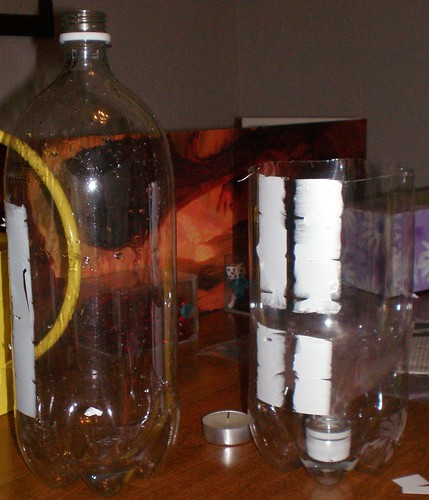
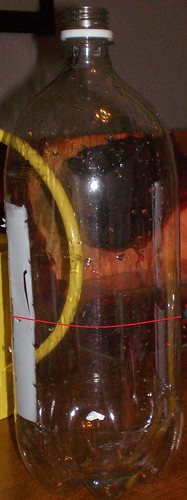
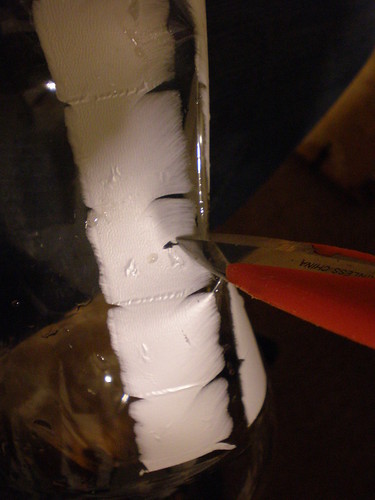
Get a hold of your bottle, remove the label, and rinse it out. Now that it's clean, the first major step is to slice the bottle roughly in half. It'll take you a couple tries before you know just how deep you want each "half" to be. I usually cut mine just a bit below the half-way mark (as shown below), making the top part (which will hold the soil) as deep as possible. As long as the top half sits will in the bottom half, just go with whatever variation suits your purposes.
Slice the Pot in Half

The most attractive way to cut the bottle in half is to pick your spot, turn it on it's side, and saw through it carefully. You'll need either a fine-toothed saw or a very large kitchen knife you don't care too much about. Another option, though a less attractive one, is to hack at the bottle with kitchen shears. That's what I did this time around, since these pots are temporary anyway. To get it started, you may need to pinch part of the bottle and snip it, then unpinch it and start cutting your way around.
Start the Cut

Now you should have the makings of a soda bottle pot before you! If the top inverts into the bottom as you like, let's start thinking about drainage. Leaving the cap on won't allow any drainage at all, but taking it off will mean all of your soil washing into the bottom. The solution is to put some holes in the cap. If you have a drill handy, use that. If you don't, then here's what I do when I don't feel like digging out the drill for small jobs. Take a nail and hold the end of it in a flame with a pair of pliers for about 15 or 20 seconds. The blue part of the flame is the hottest, so aim for that.
Heat the Nail

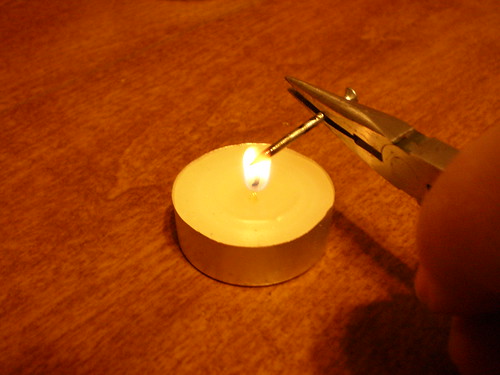
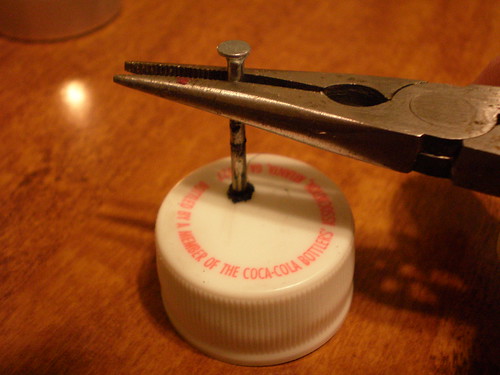
Now, still using the pliers, quickly but carefully press the tip of the hot nail through the cap as shown below. If your nail is hot enough, it should melt right through with just a little pressure. Three holes should do it, but you'll need to reheat the nail between each hole. Please make sure you're in a well ventilated area so you're not breathing chemicals from the melting plastic.
Melt Holes

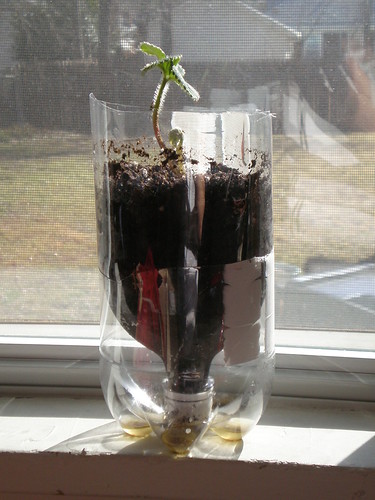
Put that cap back on the bottle, invert the top into the bottom, fill with soil, and plant! This one is pretty ugly. It was a rush job, just to get the baby strawberry plant into some soil. You can cut it much more nicely and even decorate it if the pot will be used long-term.
Finished Bottle Pot

When you're done with the pot, please don't forget to recycle it!!!

Tuesday, January 29, 2008

In Over My Head with the Strawberries?

Terribly excited about my six eight teensy little Alexandria strawberry seedlings, I got to thinking about how nice it would be to also have a couple June-bearing strawberry plants. They're more likely to be plentiful the first season, after all. I also wanted to make the one dollar investment of buying a packet of radish seeds (white icicles!) to help protect our cucumbers from evil, evil cucumber bugs. So, off to Home Depot I went.

And I came back home with sixteen baby strawberry plants!

OK, in my defense, it's terribly difficult to buy strawberry starter plants in smaller than 10-packs. And, damn it, their fuzzy little leaves were peaking out of the top of their box, what could I do, I ask you??? Leave them there? No! I had to give those babies a good home!

So now I have a cut-away cardboard box containing a motley collection of small "recycled" pots with tiny strawberry plants in the backroom.

  • 11 of them will go into the strawberry pot once we rig up a "deep watering" system, because water poured into the top of my strawberry pot loves to just gush right out of the side holes.
  • 2 of them are already snug in their pot, hanging in front of a window.
  • 2 of them will probably be repotted into pretty pots for the front porch.
  • 1 might end up in the sunny corner of our front flower bed.
The best part about this, honestly, is that I won't be completely broken hearted if the strawberries-from-seed don't produce (or even survive!). But what I want is pots overflowing with strawberries all around our house! Strawberries, strawberries, strawberries!

It's become an obsession....

Babies!!!!!!

There are six, count them, six baby strawberry plants on my windowsill! They are weeeeee leetle things with nothing but their two little baby leaves so far, but they are definitely seedlings! And they've only been in peat for about two and a half days!

I must not get my hopes up.... I must not get my hopes up....

I swear, I feel like I have as much emotionally riding on these little strawberry plants as I do on my upcoming job interview.


Keep your fingers crossed for me! One set for the strawberries, the other for my Thursday job interview!

Monday, January 28, 2008

Think Outside the Box

One of my favorite feelings is keeping something out of the landfill. It's for this reason that our recycling bin is at the curb every week but one of our trash bins only once every two weeks, that there are toilet paper rolls cut in half in my gardening supplies, and that my latest favorite recipe makes use of stale tortilla chips.

It is also for this reason that I had boxes and bags marked "thrift store" in the back room, and why I was pulling out our old wedding favors (from almost a year ago) and adding them to the collection.

In went the unopened silk petals, in went the tin rings, in went the....

Say, these little silver bells are perfect to scare produce-pecking birds away! They're shiny, light enough to move in the Oklahoma wind, and they're sturdy enough to use over and over!

Not to mention, they're adorable and will make a pleasant little tinkling sound in the breeze. Bonus!
Wedding Bells for the Garden!

Sunday, January 27, 2008

Better Than Disney Land!

As it was a lovely afternoon, off to Lowe's we went!

Acquired:
~Cheap wood to build the frame of our little square foot garden.
~Electrical conduit piping to serve as the outer frame of our trellis.
~A windowsill peat pellet tray for strawberry seedlings. (I just couldn't resist its compact convenience! I'll reuse it until its only possible purpose is to take up room in the recycling bin.)
~6 foot tall bamboo sticks to help support the brandywine tomato plants.

My current plan for the tomato supports is to use both my short wire tomato cages and to create a sort of bamboo tripod around it to accommodate the extra height and weight. Chad has serious doubts about the strength of the relatively thin bamboo, but I think it'll work OK if we keep the plants down to just two or three major central vines.

If this weather keeps up, I may start digging into the garden this week.

Seedlings, seedlings, seedlings!

About a third of the sprouted onion seeds are peeking out of the newspaper pots, the Tom Thumb lettuce has begun to poke out of their peat pellets (but not the Red Gem lettuce, so far), the Alexandria strawberries sprouted beautifully in their damp take-out box and have been moved to peat pellets (I've also put several Alpine Strawberry seeds on pellets), and I'm still waiting anxiously to see the first tomato seedling.

I've decided I'm a fan of sprouting seeds before putting them in any kind of soil. You have to watch cautiously for signs of that annoying fuzzy white mold, though.

Tuesday, January 22, 2008

Onion Sprouts and Newspaper Pots

A few days ago, I decided to start some onion seeds....

I sprouted them in this plastic take-out tray. I cut a piece of paper bag to fit the bottom, sprayed it until it soaked up the water, and sprinkled onion seeds in. Once the top is snapped shut, it stays nice and moist. I kept them near a sunny window to stay warm. And tonight, they were ready to go.
Onion Sprouts

A close-up:
Onion Sprouts Close-Up

Time to put them into some soil! It's far too cold out even for cool-weather crops, though. Newspaper pots to the rescue! After a little trial and error, here's how I made them....

You'll need black and white newspaper, a soda can, a tray or small tub, a spray bottle, and potting soil.
Newspaper Pot Materials

Cut or tear black and white newspaper into single pages and then into into quarters.
Paper

Take one of those quarters and make any adjustments to size that would be appropriate for your purposes. I folded one edge over, as shown below, to make them shorter and more uniform.
Fold the Paper

Now, wrap the paper around a soda can, letting a couple inches extend beyond the top of the can. It should overlap itself. Notice that I have put my fold on the bottom, which lets the ragged end extend beyond the can.
The Overlap

Now we're going to form the bottom of the pot. At the overlap, fold the paper over the top of the can.
Fold #1

Fold it a second time, leaving just a point of paper.
Fold #2

Fold that final point down. Voila! You've just formed a biodegradable seedling pot!
Fold #3

But it's not going to stay together all by itself. I found that it helped to spritz the folds of the pot bottom as well as the edge of the overlap.
Dampen the Folds

Place them all in the tray or tub. They should be somewhat snug, so that they will help each other hold their forms, but not crushed together. Voila!!! Your very own biodegradable seedling pots for FREE!
Snug in a Tub

They held their forms quite nicely once they were all nested and filled with soil. Here I am making indentations for my onion seeds.
Pots Filled With Soil

I put in the 16 healthiest looking sprouted seeds, covered them, gently misted the soil with the spray bottle until it looked nicely moist on top, then poured water into the tub itself to allow the pots to soak it up. I'll primarily water them by misting heavily, since I didn't set up the tub to allow the pots to drain. (You could do so by putting a layer of rocks beneath them.)
Watering

I put plastic wrap over it to hold in the moisture and keep out the cats, and I'll make room for it in the sunny laundry room tomorrow.

Once ready to plant, I can just plop the pots in the ground and the paper will biodegrade and become part of the soil. If you make these, keep in mind that they aren't as sturdy and peat pots. You may want to double the thickness if you're concerned about them falling apart when you lift them out, but I plan on lifting them out with a kitchen spatula while holding them with my other hand. Once plopped in the ground, I want them to fall apart as quickly as possible.

One other note: I'd avoid color newspaper. I've read in more than one source that you shouldn't compost newspaper with colored ink if the compost is going into a vegetable garden, so I'd venture to guess that you should keep those colored inks out of your garden entirely.

Tuesday, January 15, 2008

Early Garden Prep and Wee Little Plants

I decided it would be easier to dig up the future garden if we first kill off the grass where it's going to go. So I measured and cut two cardboard boxes to fit the 4x4 area.
Cutting the Boxes

We have yet to chop up and haul out the fallen limbs from the last ice storm, so I had to have Chad come out and help me move this one out of the way.
Fallen Limbs

Now we have some room! I laid out the cardboard, remeasured, and weighted it down with ceramic pots. The advantage of using the cardboard instead of landscaping fabric (which we do have) is that it's totally biodegradable. Provided there are a few rains or snows between now and then, we should be able to just start digging through and around the cardboard, turning it under the soil. No pins to pull up and no waste fabric to throw in the land fill!
BoxesFutureGarden

And as it's such a nice day, I also decided to bring my Red Robin tomato plants out for some light sun. It's their first trip outside though, so I had to make sure to give them some partial shade and will return them to their window after about an hour. One of these little guys will become a porch plant and the other will be placed in the garden, so it's good for them to harden off a little before we have to go through the entire process after the last frost.
Red Robin Tomato Plants

They may not look it, but these two plants are almost at full height. I staked them on twigs (from the fallen limbs) today, and that's probably all they'll ever need. I accidentally broke off a little branch from this plant in the process, which made me feel absolutely terrible for the poor wee thing!
All Grown Up, Already

I started these little guys way-back-when. It's my hope that they'll provide us with some early cherry tomatoes to tide us over until the garden starts producing.

Monday, January 14, 2008

The Most Expensive "Inexpensive" Garden Ever

I went on a planning trip to Low's today. I coveted the seed starting supplies, but resolved to use up the peat pellets I have left then to fill sliced paper towel rolls and newspaper pots with good potting soil.

I love, love, love the cute little peat pots, but it's so silly to pay money for new supplies while throwing perfectly usable materials in the trash and recycling bin.

I then took a trip to the greenhouse area to write down prices for the soil ingredients. I did find vermiculite before employees shooed me out so they could start stocking the greenhouse, and I was amazed to find that it was cheaper than the perlite! I snagged one bag and brought it home where my husband did some math in his head, a talent I lack. The vermiculite alone would cost over $30 for one 4x4 Square Foot Garden.

Oh my stars!

At best, I think it would end up costing something like $50 to fill the box with Mel's Mix. Peat moss is fairly cheap when you buy a huge hunk of it and compost isn't too bad, but the vermiculite or perlite is just killer! But the pre-mixed soil I normally buy is already peat moss, mushroom compost, and perlite, so our plans are now to use that and supplement it with a little vermiculite and another variety of compost. I also suspect we don't have to use as much soil since we're digging down before building up.

Sorry Mel, but I just can't justify coughing up $50 for your fancy mix when I can come up with a similar soil for more like to $15 and less labor. Maybe some day, when I'm a rich writer (haha!) instead of an unemployed educator, I'll give it a try and see if it's really all that much better.

Sunday, January 13, 2008

Maybe I lost (actually, quit) my job, but I've gained time to plan my garden!

My husband and are modifying the Square Foot Gardening method. The two major differences will be that we will dig into the soil beneath the ground, because plants might as well be able to spread their roots if they are fortunate enough to be in the ground instead of a container, and we will most likely use perlite instead of the far more expensive vermiculite when mixing the soil. After all, who knows when I'll find another decent paying job?

Square Foot Gardening (SFG) seems ideal for suburban gardeners and urban gardeners fortunate enough to have a small patch of land. When I made a plan for my little garden (I'll only be doing one 4x4 box), I was really pretty impressed at how many plants I should be able to squeeze in there! A smaller version of "the box" could be put to use on patios and porches, as well. Hell, simply using his spacing method for regular pots on your porch makes sense.

Current plans for spring and summer crops: Cucumbers, three varieties of tomatoes, sugar snap peas, two varieties of lettuce, carrots, red onions, and green onions. There's currently one square foot that hasn't been planned at all, so I may think of something else or simply fill it with more lettuce.

Fall crops will surely involve more lettuce and carrots, but I also want to give garlic a try.

In the porch department, I'm very determined to grow some Alexandra strawberries. I will use every seed I have left to increase my odds!