Showing posts with label container. Show all posts

Wednesday, February 2, 2011

Snow Day Seedlings!

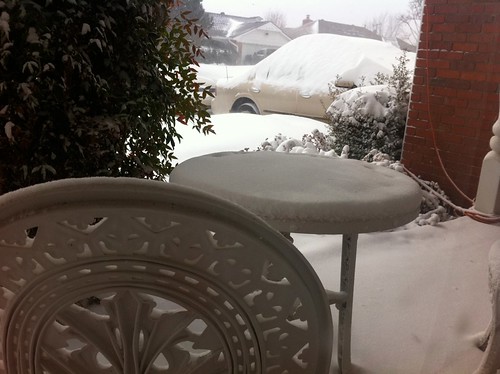
Yesterday morning was officially a blizzard here in the Oklahoma City area (and much of the Midwest!).  Chad took a lot of pictures, all from the warm safety of the inside of our house... which is much warmer than our last one!

IMG_1825

Even our covered, screened in back porch was covered with snow!
IMG_1831
That meant that Ali, our indoor princess of a cat, got to walk in snow for the first time ever!  She's been pretty excited about it but won't stay out there freezing her paws for too long.

This doesn't keep me from thinking about warmer months.  I moved my seedlings away from the cold windowsill and decided to take a quick snap of them to share.
From bottom to top: Yellow Tumbling Tom tomatoes, Red Tumbling Tom tomatoes, globe basil, genovese basil, and Red Robin tomatoes.
Tiny Alpine strawberry seedlings in a Jiffy pot.
All of these varieties are ideal for containers, since that's pretty much all I'm going to do this year.  I'll probably also grow one larger determinate tomato plant and maybe some baby-sized lettuce varieties.  Simple is my motto this year!

Saturday, January 16, 2010

A Portable Garden

Because we might be buying a new house in the next few months (yikes!), this year's gardening plans focus on the portable. Everything I'm choosing must either be able to survive in a pot (like not-too-big determinate tomato plants), or it must be something that could be harvested early (like lettuce).

It feels good to simplify. This is why I love container gardening in the first place! There are ants all over the basket of strawberries? Well, brush them off and move the strawberries to the front porch! There's an unexpected spring freeze on its way? Just move everything inside to the utilities room! We're moving? No big deal! Put those pots of Red Robin Tomatoes in the back of the car and let's go!

With this in mind, I just ordered most of my (very few) "new" seeds for this season:


The Tumbling Toms are perfect for hanging baskets, and I have a pot large enough for a determinate like the Fabulous Hybrid. Lettuce is no problem at all, as it can be harvested and enjoyed even when it's still very small.

I will still most likely buy some parsley seeds, and maybe spinach. Everything else will come from my existing stash or from seed-swaps.

I feel good about this upcoming season, and I'm so happy next month is February! We'll soon be starting winter vegetables!!!

Tuesday, April 7, 2009

Gardening on a Budget: Containers

This topic could turn into a huge post, but I'll try and keep it simple. The most basic commandment of container gardening on a budget is: Try and view everything you come across as a potential container.

Everything.

I've seen old boots, blue jeans, and broken down cars turned into containers. Practically anything could work if you get creative enough!

Funkiness aside, there are some pretty good standbys that thrifty container gardeners fall back on often...

  • Food grade buckets. Sometimes you can get these for free from food establishments, and they're a good size for plants that need a little more room to spread their roots.
  • Big plastic tubs. Again, these can come in good sizes for plants that need legroom. Some people have also converted them into DIY Earthboxes.
  • Trashcans as huge planters. Some of the larger tomato plants could even flourish in a big enough trashcan.
  • Two-liter bottles. Check out this older post wherein I illustrate how to turn one into a pot with drainage.
  • Plastic butter/spreadable cheese/yogurt containers, for smaller plants. Reserve the lids to use as water trays, but be sure to water slowly to avoid overflow.
  • Soda bottle, upside-down, as a DIY Topsy Turvy. Is there nothing these plastic beauties can't do?!
  • Really ugly pots that you already have or find free/cheap.... just turn them upside down and spray paint the pots to spiff them up. (Avoid getting paint inside the pots.)
There are so many other options, but these tend to be fairly accessible and easy. Just remember to avoid anything that held chemicals, clean everything out before planting, and drill holes in the bottoms for drainage when necessary.

If you want to find "real" pots at good prices, there are usually plenty of cheap options at discount stores like Big Lots and Wal-Mart. The dollar tree often has really cute little pots, but they usually need to have drainage holes drilled in them. End-of-season sales are a great way to find deals at local businesses, which we should all support whenever we can.

Plastic is usually the cheapeast option... But if you'd like to avoid plastic, terra cotta is probably the cheapest way to go.

And take care of your pots so you don't have to spend money replacing them. Put them away when not in use (especially over winter) and treat even the plastic ones as breakable.

I know there are a million and one other tips out there, so please share yours!

Sunday, March 15, 2009

Gardening on a Budget: Soil

Especially if you're a container gardener who wants to grow organically, the cost of soil can start looking pretty high. So let's look at a few ways to cut back on that cost.

  1. Screw the fancy "organic" soil that companies like Miracle Grow sell, because it's way expensive (and not all that great, in my experience). Instead, pick up those 40 pound bags of cheap soil with "compost" in the ingredients rather than "fertilizer." They're sometimes cheaper than that small bag of "organic" soil, and I've had great luck with them.
  2. If you're growing in-ground or in a raised bed, you don't need to add new soil every year. Compost is usually all you need to add.
  3. If you're a container gardener, you can often reuse your potting soil. The most important rule is to never reuse soil from diseased plants -- that stuff needs to be thrown into the deepest darkest corner of land where you won't grow anything you care about. If, however, your plants were healthy and strong, you can take out the old plant, mix in some compost, and reuse. Some people feel it's necessary to bake the soil (yeah, as in baking it in an oven), but I've never bothered. When I'm not 100% confident about reusing a pot of soil (often because a cat used it as a litter box!), I'll use it for non-edible plants just to be safe... or I'll use it to fill in holes in the backyard.
  4. Don't use containers any bigger than your plant will actually need.
  5. Use companion planting in you container garden. For example, why put basil plants into their own little pots if you're also growing potted tomatoes? Basil and tomatoes love each other, so go ahead and tuck that basil plant into the corner of the tomato's pot.
As a side-note, I don't recommend just sticking yard dirt into a container, especially if you plan on bringing it inside. Part of the benefits of container gardening is reduced pests and weeds, and yard dirt is full of them.

Thursday, April 17, 2008

Strawberry Pot Watering System from Soda Bottles!

I absolutely hate my strawberry pot. It's difficult to plant and the water tends to just pour right out the side holes before reaching the lower soil. Lovely.

But seeing as I was up to my eyeballs in Alexandrias and Chad was so tickled by the idea of strawberries in a strawberry pot, I decided to give it a go again this year... with one adjustment.

You see, the lower plants never get any water if the water just pours out the sides. This seemed like something I could actually fix. A little googling revealed that some other gardeners drill holes in a length of PVC pipe, stick it in the pot, pour soil around it, and plant the strawberries. Very clever, verrry clever indeed...

But the only PVC pipe I had was too skinny and so ancient I was afraid it would leach scary chemicals into the soil and I really didn't want to go buy a new one and deal with drilling. So I decided to do one of my favorite things ever: reuse trash!

So, here's how to make a watering system for your strawberry plant....

1. Dig small coke bottles out of the recycling bin. How many you need depends on how tall your strawberry pot is. (Mine comes up to my knees and I used three bottles.) Rinse them, remove their labels, and cut off the bottoms. Be sure to keep one of the caps.

P4050032

2. Now, you need to stick the bottles inside of each other, in a sort of daisy-chain way, to create a pipe effect. Tape them all together, sealing the seams well, with packaging tape. Please note that none of the "inside" bottles should have caps on!

P4050033 P4050034

3. Next step is to melt or drill holes in the bottles. With thin plastic like this, I'd vote for melting. Make sure you do this in a ventilated area. The basic steps are:

a. light a candle

b. hold a nail in the flame with a pair of pliers, not your bare hand

c. once hot, make holes by poking the nail into the plastic

You'll need to reheat the nail every now and then, but it makes for pretty quick work. (For illustrations on how to do this, see how I melted holes in the plastic caps for these recycled pots.)

4. Once you have a few holes in each of the bottles, put the cap on the one exposed bottle top and see how the system fits into the pot. As long as it's tall enough to come above the soil line, you're good! Trim the top bottle if it sticks way above the pot's lip.

P4050036

5. Once ready to go, hold the bottle in place and dump in enough soil around it to reach the first set of holes. It should stand fairly sturdy as you now continue to plant each of your strawberry plants. (Note that you may want to stuff a cloth in the top while you pour in the soil, to avoid getting soil in the watering system.

My end result:

P4170065 P4170066

It works well, but I do wish now that I'd trimmed down the top bottle just for appearances. But all of the plants that looked healthy going into the pot look healthy after a couple weeks of living there. I'm pretty pleased with how evenly this seems so moisten the soil, and I think the plants are pretty happy about it too. The only drawback I can really think of is that all plastic (even PVC!!!) starts leaching chemicals as it ages. I'd probably replace the tower of bottles every year, which shouldn't be too tough once the pot is filled with roots.

Wednesday, April 16, 2008

Ripe Cherry Tomatoes!

Behold!  My first ripe tomatoes of 2008!  P4150065

They're on one of my Red Robin plants, which are tiny enough to keep in hanging planters.

P4150081 P4150072

The other doesn't have any fruit at all yet, but it is finally covered in tiny little flowers!

P4150073 

Seriously, these plants are amazing.  They aren't the prettiest tomato plant I've ever seen, with their curly leaves and tendency to slump right over, but they're producing blossoms and fruit despite getting no direct sun at all.  They spent the winter months getting a little through a south window and have been hanging in total shade on my north-facing porch ever since.  Pretty impressive, huh?

Oh, I also found two adorable small-leaved basils to pair with them in their pots.  They're bushy, so they probably won't get too horribly ugly and leggy being in the shade.  I <3 these little basils!

P4150074

Monday, April 14, 2008

Last Frost (I Hope!) and Tomato Planting

  Oklahoma City's average "last frost" is listed somewhere between early and middle April (depending on what source you're using), and last night was just about at 32.  We brought in many of the plants and covered the rest, including the garden.

P4140043  P4140042

P4140040 P4140041

Everything made it through the night without a problem.  I'm not even totally sure it got to freezing at any point.

But the really wonderful thing is that I'm pretty sure that's the last night we have to worry about freezing temperatures at all.  Before I'd even finished my coffee this morning, I was out in the garden planting the tomatoes!  The results:

P4140058

P4140051

They look so tiny now that they're up to their necks in garden soil!  It was sad to see them go from looking like impressive tomato plants to itty bitty seedlings again, but I'll appreciate myself for that later in the season though, when they're growing strong because of their deep, fabulous root systems.  I'm really going to have to work at containing them in their cages, but at least the cages seem quite sturdy once all four have been tied together.

So, what tomato plants wound up in the garden?

Two Pink Brandywines:

P4140056 

P4140057


One Supersweet 100:

P4140053


One Genovese:

P4140052

The Genovese is a new plant I purchased for 75 cents at the farmer's market this Saturday.  The third Brandywine I was going to put in the garden is still clearly stunted from lack of water when it was a tiny seedling, so it's not likely to ever produce much.  I'm keeping it in a small pot for a little while just incase anything happens to the other Brandywines, but he's pretty much out of the running now.

I also planted the other Supersweet 100 in one of my largest pots, added a purple basil (I always try to pair a basil with my tomato plants!), and set it just outside the back steps:

P4140049

He looks positively dwarfed next to that full-grown basil!  But it's all for the sake of a good root system, and soon he'll be the one doing the towering.

As for the hanging Red Robin tomato plants, one of them has two reddening tomatoes!  I'll surely take photos and gloat as soon as they're ready to pick.

Friday, April 11, 2008

June-Bearing Strawberries

Strawberry update!!!

I have a basket of June-bearers just outside my back door that is just a pleasure to watch. First of all, the older of the two plants in that basket is already growing strawberries!

P4100149

The plant on the other side of the basket has been in it's sunny little home for only a day. You see, I'd decided I had more than enough strawberry plants with all those Alexandrias... but I'm still so drawn to them! So I stopped by the garden center at hell Wal-Mart while running an errand there yesterday and looked at all of their lovely strawberry plants. Some had berries already, but looked like they were in terrible shape. (Actually, just about everything was in bad shape there. I don't know if it was because they weren't sheltered in the recent storm or because it was Wal-Mart.) But next to those were beautiful, broad-leafed strawberry plants boasting a claim to pink blossoms, and all I could think about was how lovely that would look paired with the white-blossoming plant above.

I touched and sniffed and looked for interesting leaves. Then I picked up one plant and it seemed to tug right back, unwilling to leave its brothers and sisters. A little gentle investigation revealed that it had set out two runners into the separate pots of two other plants, so this was in fact three strawberry plants in one. At 88 cents a pot, how in the world could I pass up an experiment like this? I snatched it right up.

Once home, I snipped off the larger of the baby strawberry plants and put it in a pot. It already had a good start on its roots, you see, so it was time to take that work load off of the mother plant. The other one only had a few roots though, so I rigged up the set up you see below:

P4100147

Basically, I potted the mother plant in her forever-home then dug a shallow indentation next to her so that I could pot the baby separately without cutting the runner it was attached to. I'll give it a few days to establish itself, then I'll "cut the cord" for the mother's sake.

That's the thing about runners. You end up with more plants, but the process takes a lot of energy from the mother plant. You have to cut the runners off if you want berries from the mother. If you don't want to sacrifice berry production in order to gain baby strawberry plants, then you want to cut the runners at first sight.

That said, you can also use this method to increase next year's berry yield significantly if you're in a warm environment or can otherwise over-winter the plants. Pinch off any blossoms as they appear, let those runners take root and grow a bit before cutting the cord, and then you'll have tons of plants for next year.

As for me, I'll stick with these two runners and snip anymore that show up. I really only got the June-bearers for instant gratification. Next year, I should be up to me ears in berries from the ever-bearers!

Monday, March 31, 2008

Storms, Pictures, and Various Seedling Updates

I've been up since the tornado sirens tonight, but nothing more than rain and lightening actually came close to our neighborhood. The entire time the sirens were going, though, all I could think about was the fact that I had opted to leave all of the seedlings outside for the night! Nooooo!!!

But no tornadoes for us, thank goodness. I think I may have heard some hail though, so I hope nothing got hurt.

In any case, I recently took pictures of some of the young garden plants, which are coming along rather nicely.

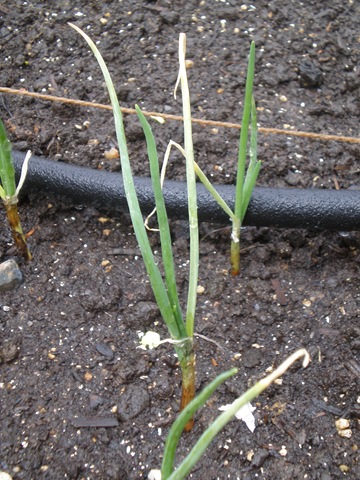
Onions:

Onion3-30

The onions really are looking nice. It's so tempting to pull back the dirt and look for bulbs!

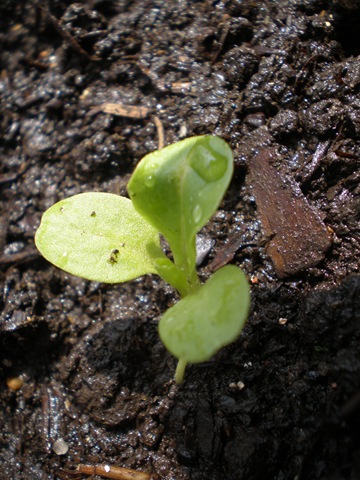
Little Gem Romaine lettuce:

GemLettuce3-30

They're all growing sets of true leaves, so it shouldn't be long before we actually have tiny little bunches of lettuce.

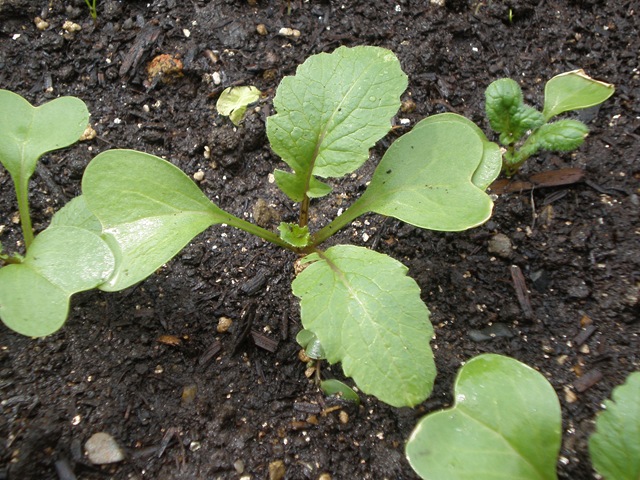
White Icicle Radish:

Radish3-30

Most of them have true leaves now, and a couple of them are just huge! These were a very last-second addition to the garden, and I'm so pleased I decided to try them.

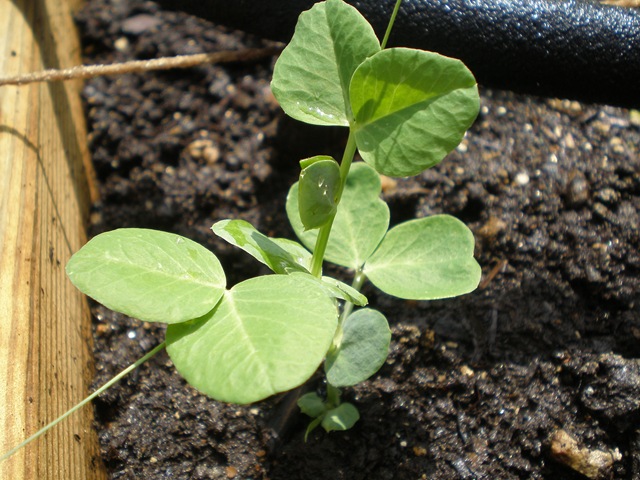
Sugar Snap Pea:

Pea3-30

All four of the sugar snap peas are getting big and beautiful like this fellow. Look at the little tendrils seeking support! It's definitely time to put in the trellis... this week.

Cucumber plants are finally peeking over the soil, but don't look like much so far. I had to thin the carrots like mad, but they aren't very interesting looking plants yet. I'll post photos as soon as they're a little more visible.

Strawberries!

I've potted a few strawberries. A basket with two June-bearing varieties, a basket of Alexandrias, a basket of Alpines, and one single Alexandria sitting on the bottom back step (to see if the stray cats will leave strawberries alone before I risk them in large numbers). Most of them look wimpy so far, but the ones that have been in their pots for a while are getting stronger.

Emergency Tomato Transplants

I had a tomato transplanting emergency the other day. The seedlings were outside for hardening off (which is complete!) and the Oklahoma wind decided to pick up like mad once I was inside. It managed to crack one of the delicate brandywine seedlings right at the base. It was time to put them in more soil anyway, so I hurriedly repotted them all up to their necks and the cracked seedling is still looking healthy. Seriously, I would have stomped childishly if I'd lost it. I feel like I didn't start enough of the brandywines, and one already looks less healthy than the others.

Just about two more weeks until it's time to put them in the ground!

Flowers

As I've commented before, I'm more into edible gardening than flower gardening or landscaping. However, Chad and I have made quite a team on the porch and in the flower bed. He's put something like 20 purple annuals in the flower bed so it'll look nice and full while the perennials establish themselves, and I've started seeds in several pots on the porch. There are cheapie square planters on each step up to the porch with tiny Petite Marigold seedlings, and we got a little experimental by planting the marigolds in a ring around alyssum in two squat barrel-style planters on either side of the porch. Tiny seedlings in these, too. We'll take photos once they're more visible. I'm honestly not the biggest fan of Marigolds, but it's difficult to pass up 10 cent seed packets and they do make decent mosquito deterrents.

What I'd like to do next year, however, is to grow only edible flowers in pots, and maybe even a few in or around the vegetable garden. Decoration is nice, but I much prefer plants with more of a purpose.
Tuesday, March 11, 2008

Repotting and Seedling Cleanup

Phwew, yesterday was productive!
  • Re-potted Red Robin Tomato plants into hanging cone planters.
  • Watered and checked on garden. Onions are doing fabulously, but I see no growth from seeds yet.
  • Put baby tomato plants into some soil in a four-cell tray, as their little roots were starting to poke out of the peat pods.
  • Started "cat grass" in a left over plastic tray for the kitties.
  • Threw out dead seedlings (used their soil for re-potting!) & consolidated the living onto one large tray.
I realize now that the RR tomato plants are going to be a bitch to harden off, as they are extremely heavy in their hanging cones. I can handle it, but I'll be leaving them outside overnight the very second I think I can get away with it! I actually think Wednesday evening is supposed to stay as warm as the 50s, so that may be their first night out.

I think I have a plan for growing container tomatoes in the future. Once they're ready for a full-sized pot, I'm going to plant them deeply and with a few inches left at the top of the pot. This way, I can fill in more soil once they're larger and leggy. I think this'll work nicely.